February 7, 2012

Leather Wrap Bracelet Tutorial

Leather wrap bracelets have been all the rage recently!  The colors and types available are endless.  This is a tutorial on how to make your own!

Supplies:
Button or bead for the clasp
Beads with a little larger hole
Beading thread
Leather cord (1 to 2mm)
Big Eye beading needles
Cutters
Glue


Steps:
1. Cut a 24 inch piece of leather and 4 feet of thread.  Center the button the leather and tie an overhand knot and pull tight. Get as close to the button as you can.


2. String a big eye needle on each end of the beading thread.


3. String one bead onto your thread and center it.  Place this bead in between your leather cords just beneath your button.  The thread should lie on top of the leather cords.

4.  Flip the leather over the top of the thread and pull the threads down to the center in between the leather cords.  The thread is now underneath the leather.

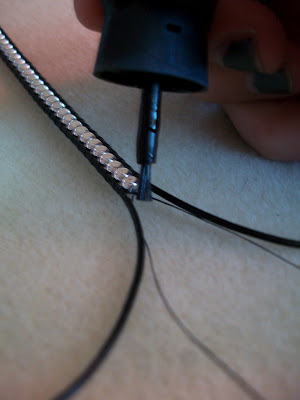
5. Thread the beading needs through the top bead in opposite directions (right needle goes through the bead towards the left and left needle through the bead towards the right).  Pull tight.  This will anchor the bead.  The thread is now back on top of the leather.


6.  To add a bead, flip the leather back over the thread and pull the threads down towards the middle like in step 4. String a bead onto one of the threads just a few inches.  Use the other needle and go back through the bead in the opposite direction.  Pull the threads simultaneously to make an "x".  Pull tight so this bead is right beneath the first bead.  The threads should now be back on top of the leather.


7. Repeat the above step until you reach your desired length.  When you wrap your bracelet around your wrist, the last bead and the first bead should touch.
(halfway there!)

8. When you have finished adding beads, flip the leather over the top of the thread and string the needles through the last bead in opposite directions.  You'll be able to see the thread wrap around the leather pieces. This is very similar to step 5.  

9. Remove the needles, tie a knot with the thread right below the last bead and add a dob of glue.  Trim the thread.


10.  Tie an overhand knot with the leather cords right below the last bead and pull tight.


11. Use the button to measure how big to make the end loop.  Tie another overhand knot to complete the loop. 

After you trim the excess leather, you're done!  Now you can make as many leather wrap bracelets as you want.  These instructions are for single wrap bracelets, but you can make double and triple wrap bracelets as well!  Please use these instructions for your own personal use only.  I hope you enjoyed this tutorial. :)


January 12, 2012

A Winter Wreath

As Christmas passes and the holiday decorations come down, my heart is always a little sad to say goodbye. When we were in Lincoln, my mom offered me an old, dusty moss/dried flower covered wreath hoping that I could reuse the base wreath. On our way back to Minnesota I came up with a grand plan for the sad wreath: a winter wreath (especially since my only other options are a Christmas wreath and a wreath that my mom made from our wedding corsages which looks a little too much like summer/fall).

What I brought back with us looked like this:


 We pulled off most of the dried flowers, but some hot glue and moss remained. 


The supplies: a wreath form, a bundle of sticks, some white (Christmas) beads I found on sale for $0.39 at Michaels, my trusty hot glue gun, and blue ribbon that is not in the picture. 


 I found the bundle of sticks at Target on clearance for $2.98 (normally priced at $9.99).  I decided to go with store bought sticks (instead of trying to find my own from outside) not only because they were on clearance, but also because I figure that the relative uniformity would help in the overall look and because I have recently experienced a spell of really bad allergies and the last thing I need is to bring more allergens into our house.


I began by breaking the long sticks up into smaller pieces, about as long as the wreath's diameter.


After I had all of the sticks broken up, I took little bundles of 7 or 8 sticks and hot glued the group about 1/4 of the way in on one side of the bundle.

I then flipped the bundle over and attached it to the wreath, holding it in place.  As I moved around the wreath, I was careful not to be too picky about parts of the wreath showing through. I wanted to solidify the pattern and angle of the sticks and if I messed with the bundles too much or tried to add too many sticks at one time, things would start to fall off.


When I finished gluing completely around the wreath, I had a good number of sticks left over which I used to then fill in the gaps and make the wreath look fuller. I also was much more meticulous in how I glued the sticks on because I wanted to try and cover up the hot glue that showed through. (The part in the lower right corner with hot glue showing is where I decided to place the bow and white beads, which was convenient because I was tired of trying to convince the hot glue to cooperate at that point).


With the wreath finished, I then glued on the white beads and began making a bow. I wanted a fuller bow than a simple tied bow, so I folded the ribbon back and forth making 3 loops on either side. Every time I would loop the ribbon, I made sure that the length was always the same (otherwise the bow would have ended up looking less full and more funny).


Once I had my 3 loops, I wired the bow together in the middle and cut the end. 

 
I then created a middle tie by using a small piece of the ribbon, folding it in thirds, and then I wrapped it around the center and glued it in place. 


The finished bow:

*also, this is the closest I could get to the actual blue of the ribbon... different lights affect coloring differently  

Put it all together, and you have a wonderful winter (but not Christmas) wreath!


 A close-up of the bow/bead detail:


The wreath in its proper place:


We previously had stockings hanging beneath the Christmas wreath, so now we have little mittens hanging there instead. My mother-in-law gave them to me. Aren't they cute?

 
It was fun to create a little pizzazz for winter. The total out of pocket cost of the wreath ended up being less than $3.50!

January 9, 2012

A New Craft Space

We moved into the house we are renting at the beginning of October, and since then I have been looking for a craft desk to house all of my various crochet hooks, yarn, stamps, sewing machine, and whatever else would fall into a "craft" category. We had been housing the sewing machine on an end table in the spare bedroom, my sewing box under the bed, and everything else was lumped into this semi-organized (term applied loosely) corner:


It was quite painful to look at. I still shudder. Not only that, but it became difficult to work on projects because every time I would have to unpack the space (read: wrestle with balancing everything perfectly just to grab something out of the bottom box while not wanting to actually take everything off above it), then when I was done or we needed to use the spare bedroom for guests, everything had to be put back together. Needless to say, I think David was getting tired of me always jeopardizing the dining room table, the spare bedroom, and wherever else my craft circle of chaos touched.

Thankfully, when we were back in Nebraska for Christmas, we stumbled upon the perfect desk for me in Michael's. With it being 40% off, I had to get it. If not for my sake, then definitely for the sake of David's sanity.


Of course, after seeing this we made Seth (David and Rachel's younger brother) carry it by himself.

We packed it up, along with our other Christmas loot and when we got back to Minnesota, the first thing I wanted to do was get that desk together so I could finally feel organized. Naturally a few days passed, but eventually we did open the box and got it put together in one night.


Screws and pieces of wood all over. A mess was made, in hopes of eventual organization.


I'm thankful my husband is so savvy with tools and follows directions well.


And when we needed to switch the direction of the top, he drilled new holes so it fit like a charm.


While I (slowly) screwed together the drawers. 

But in the end, it was all worth it because, drum roll please....

I finally had my space organized! Everything is now readily accessible without all sorts of juggling or strife (and David has his sanity once again... last I checked).

January 2, 2012

Lost Wax Casted Ring

 I think that it is slightly ironic that our first post is not actually something that either Rachel or I made. The technique is Rachel's specialty, but the execution is her brother and my husband, David's. However, he is gracious enough to let us show case his idea and work. So here goes our first post...

The workspace: I (Rachel) was actually passed down a desk from David.  It has since become a full-time silversmithing desk and a full-time mess.  Propane torches, pliers, charcoal blocks, and metal are just a few of the items that inhabit this area.


Wax casting elements: Lost wax casting is a technique that, in theory, is relatively simple.  One carves something out of wax, in this case, David carved a plain band, and made a mold of it using plaster.  I have respect for anyone with the patience to carve unique pieces out of wax.  It is a skill I have yet to master. I'd much rather saw, solder, and file silver. Anyway, I digress.  Once the wax piece is finished, a wax rod is melted to the bottom of the piece to make a tunnel for the metal to flow into.  The piece is then set in a metal tube (as pictured), plaster is poured on the top, the plaster sets, and then you burn out the wax.  Once the wax is completely burned away, a vacuum pump is hooked up to the underneath side of the porous plaster, silver is melted in a crucible (also pictured), and poured into the mold. And boom! Lost wax casted jewelry.


The design: David drew the following picture after a plain band had been casted, cooled, and sized. Next he had to implement his design through soldering.


In these next two pictures, David is soldering (I taught him :) ) different design elements (leaves and vines) to the plain, casted band.  Silver soldering is different than normal soldering in that, you use a propane torch, silver solder, pickle, and flux to solder pieces together.  The flame has to be constantly moving so you don't melt things on accident.


David gave me a stand with little clippies! It should make holding things into place while soldering much simpler.  


Almost done! Time to tumble the ring (shine and harden), antique, and polish!


The Final Product: A lost wax casted ring with leaves and vines and a little baby accent pearl!  A ring all for Nicole made by David all by himself.


It was a lot of fun and I enjoy being able to teach and share my skills with my brother. I hope you enjoyed a little insight into Lost Wax casting!